healthy, vegan (gf!) brownies

I always have a stash of these in my fridge. My kiddos beg for them after all meals and have no idea they are actually good for them! My Hershey’s chocolate loving mom was in town this week and made a face at the thought of a brownie that was healthy and without sugar/flour/eggs etc while I was making them; however, I kept catching her in the fridge sneaking them once they were finished  😉 She later admitted they were delicious and needed the recipe!

5E7F2208-6B1F-466D-8162-0F94C837B5AA.JPG


Healthy, vegan, gf BROWNIES!

Ingredients:

Brownies:

  • 425g (approx 2.5cups) Medjool dates, pitted (if dry, soak them in warm water for 10minutes, then drain) **Must be Medjool dates!
  • 1 cup walnuts
  • 1 cup almonds
  • 3/4 cup cacao powder unsweetened cocoa powder

Frosting:

  • 1/2 cup coconut oil- melted
  • 1/4 cup cacao or unsweetened cocoa powder
  • 1/4 cup maple syrup
  • 1 tsp vanilla
  • 1/4 cup roughly chopped walnuts

Directions

  1. For the Brownies: Place the 1 cup of almonds and 1 cup of walnuts in a food processor and process until finely ground.
  2. Add the cacao powder and pulse to combine. Transfer this mixture to another bowl and set aside.
  3. Put the dates in the food processor and process until only small bits remain. Remove and set aside.
  4. Add the almond/walnut/cacao mixture back into the food processor- now, while processing, drop small handfuls of the dates into the food processor. This part is key- only process until a dough consistency is achieved. You DO NOT want it too sticky. You only want to add enough of the dates so that the mixture will hold together when squeezed in your hand or fingers. A brownie like pebble consistency. You probably will not use all of the dates. If you get it too moist, it will become more of a fudge like texture/taste than a brownie..
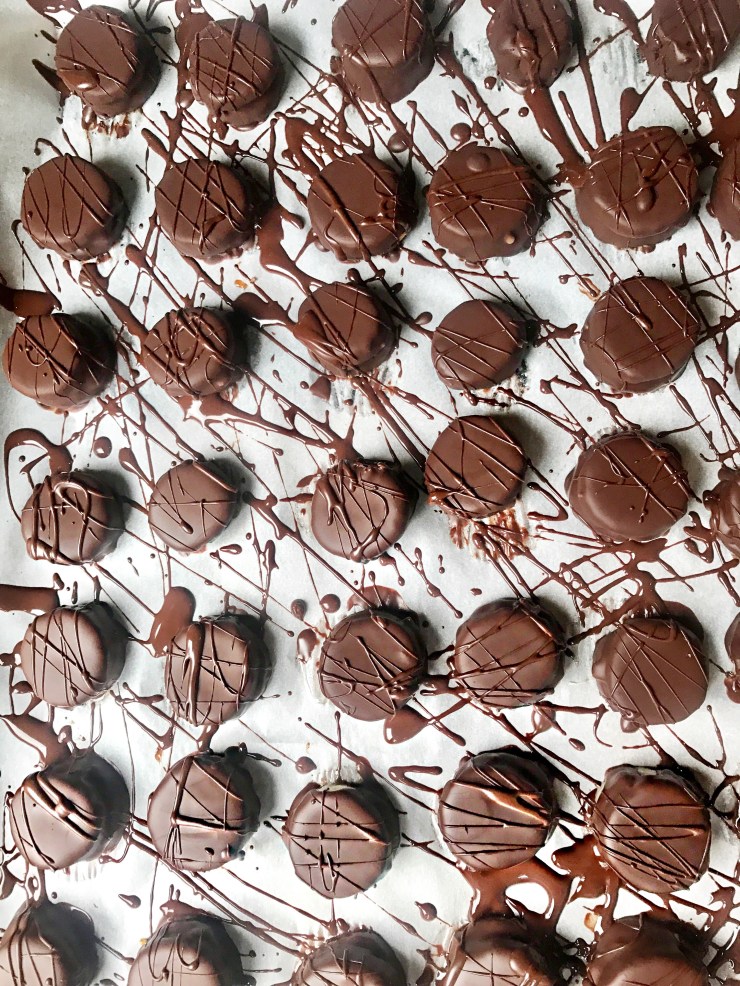
  5. Add the brownie mixture to a small parchment lined 8×8 dish. Press down with your hands until it is flat and firm. Then, lift the parchment paper to remove brownies from the dish and use your hands to slightly squeeze in the sides to create a smaller square- this will make the brownies a little thicker and more dense.
  6. Place back into the dish and put in the fridge to chill while you make the frosting.
  7. For the Frosting: Melt the coconut oil and mix with remaining ingredients EXCEPT for the walnut pieces. Once smooth, let it cool slightly so it thickens up. Once slightly thickened, spoon and smooth over the brownies. Sprinkle with the walnut pieces. Then return to fridge to set.
  8. Once set, remove from dish and cut! Store in an air tight container in the fridge for the small amount of time they last before everyone eats them!

enjoy!

xox

aj

Dark Chocolate & PB bananas

img_5585
Do I have a treat for you! These scrumptious desserts are so easy to make and HEALTHY! Probably not when you eat the entire batch like I seem to be doing lately, but still- better than a pan of brownies, right?! Healthy and delicious. I was sold.

Ingredients:

  • 2-3bananas
  • creamy peanut butter (read your labels! It should only include peanuts)
  • 1 cup 60% cacao baking chocolate
  • 1.5tbs coconut oil

Directions:

  1. Cover a baking sheet with parchment paper. Slice the bananas into thin slices and place half of them on the baking sheet. Spread peanut butter onto each of those banana slices, then top with a banana slice. Place these in the freezer until frozen.
  2. Place your chocolate and coconut oil in a bowl and microwave until melted. Make sure and stir until smooth! Use a fork, spoon, your fingers- whatever you want- to cover each banana bite in the chocolate. Then, place them back in the freezer!
  3. Store them in the freezer for quick snacking/a tasty treat! Mine didn’t last very long..

Happy treat making!

xox

aj

protein fudge

I found this recipe from Lisa at Lunchpails and Lipstick  and it is just too good not to share. I make one small change in the protein powder, but that’s it. It is a staple in my fridge…for the short amount of time it lasts before I eat it all! It is so easy. No chopping, food processing, nothing. Just throw it all together.

Ingredients

  • 1 16oz Jar Natural Creamy Peanut Butter (read your labels people! It should just be peanuts!)
  • 1 1/4 cup Natural, Raw Honey
  • 2 scoops Plant Based Chocolate Protein Powder (I use this one)
  • 3 cups Oats

Directions

  • Heat Peanut butter in the microwave for 90 seconds. Stir in honey. Mix in protein powder.
  • Combine oats with peanut butter mixture
  • Spread evenly in a 9×13″ pan and refrigerate for at least an hour, or freeze.
  • Cut into squares. Enjoy!

I promise these won’t last long! They are one of my favorites- and my kiddos!img_2705

black bean & roasted veggie tacos

How does Taco Tuesday sound today!? Mix it up and do an all veggie version that I promise won’t make you miss the meat.

Black Bean & Roasted Veggie Tacos

  • 1.5 cups cored, seeded and diced, tomatoes
  • 1.5 cups corn kernels (can, frozen or fresh!)
  • 1.5 heaping cups of diced zucchini (about 1 zucchini)
  • 1.5 heaping cups of diced yellow squash (about 1 squash)
  • 3/4 small yellow onion, chopped (a little less than 1 cup)
  • 1 cup diced red bell pepper (about 1 bell pepper)
  • 3 Tbsp olive oil
  • 1 tsp cumin
  • 1 tsp chili powder, divided
  • Salt and freshly ground black pepper
  • 1 cup canned black beans, drained, rinsed and warmed
  • 1/3 cup cilantro, chopped
  • 1 1/2 Tbsp fresh lime juice
  • Corn tortillas
  • Queso fresco, shredded cheese, or feta for serving

Directions

  • Preheat your oven to 400 degrees
  • Place the tomatoes, corn, zucchini, squash, onion and bell pepper on a large baking sheet. **make sure all the pieces are cut about the same size- except for the tomatoes. You can cut them a little larger- they will shrink in size** 
  • In a small bowl, mix together the olive oil, cumin, 1/2 tsp chili powder & salt and pepper. Drizzle this mixture over the veggies on your baking sheet- toss evenly to coat and spread them out.
  • Bake in the oven for 10 minutes- toss and spread out- then roast for 10 more minutes.
  • When the veggies are almost finished, warm up your black beans and toss them with salt and the rest of your chili powder, 1/2 tsp.
  • Once the veggies are finished roasting, add the black beans to them as well as the chopped cilantro and then drizzle lime juice over everything! Toss.
  • Heat up your corn tortillas in a skillet with a little bit of oil so they get some nice golden brown spots.
  • Then, serve ’em up and enjoy! Top with the cheese of your choice, sour cream, salsa- whatever you like!

These are amazing the next day as well. I take a non-stick skillet and pour the veggie mixture on one side with a little olive oil and a couple corn tortillas on the other side- warm everything up and then enjoy them all over again!

img_6733

{vegan} mexican stuffed bell peppers


Need something healthy, delicious, and quick on the menu this week? I have a winner for you!

Vegetarian Quinoa Stuffed Peppers

  • 4 large bell peppers- any color
  • 1 cup quinoa
  • 15oz. can black beans
  • 1 cup corn (frozen/can/or fresh!)
  • 2 green onions
  • 2/3 cup salsa
  • 2 Tbsp nutritional yeast (it’s a vegan substitute for cheese- you can use your favorite cheese too if you’re not vegan)
  • 1 1/2 tsp cumin
  • 1 tsp paprika
  • 1 tsp chili powder
  • 1/2 tsp garlic powder
  • 2 tbs hemp seeds
  • optional things to add: tomatoes, green chiles
  • optional toppings: guacamole, more salsa, more cheese (for non-vegan)!

Directions:

Cook quinoa according to package directions- you can use vegetable broth instead of water for more flavor. Meanwhile, halve bell peppers, remove seeds, stems, and ribs and preheat oven to 350.

Rinse and drain black beans, corn, and slice the green onions. In a large bowl add the cooked quinoa and all remaining ingredients except for the bell peppers. Salt and add additional spices to taste!

In a lightly oiled/sprayed 9×13″ baking dish, place your bell peppers cut side up. Fill/stuff each with a generous amount of filling. Make sure to fill all the crevices – press down and keep stuffing! Cover dish with foil and bake for 35-40 minutes. Then, remove the foil and bake for 10 minutes more. Enjoy!

cookies and kale

I declared April my get healthy month, but I’ve done little to change my diet and (currently non-existent) exercise habits.  Shame on me.  Once upon a time not long ago I was in great shape, so I know what I’m missing… I’m just having a hard time getting going.

My sister is pretty solid on the healthy eating front.  She sent me these recipes and claims that even her kids love them.  I plan to give them a try and thought I’d share in case anyone else wants to play along!

cookies

Protein Cookies

  • 3 cups oat flour (rolled oats ground into a flour)
  • 2 scoops vanilla protein powder (OR just sub an extra 1/2 cup oat flour)
  • 2 T sugar (optional)
  • 1/2 t sea salt
  • 1/2 cup + 2 T nut butter of choice (i.e. peanut butter, almond butter..)
  • 3/4 cup honey (OR brown rice syrup if vegan)
  • 1/4-1/2 cup unsweetened almond milk
  • White chocolate chunks (OR chocolate chip of preference)
  • Dried raspberries and cranberries

Directions:

  1. Line a large baking tray with baking paper and set aside.
  2. In a large bowl mix together oat flour, protein powder, sugar, and sea salt.
  3. In microwave or on stove, heat the nut butter and honey until melted and stir together.
  4. Add the liquid mixture to the dry mixture and stir until fully combined.  The mixture should be crumbly.  Slowly add almond milk until a very thick dough is formed.  Stir in the chocolate pieces, dried raspberries and cranberries until fully incorporated.
  5. Using your hands, form small balls with the dough and press into a cookie shape on the baking tray.  You can use a fork to smash in decorative lines.  Refrigerate for at least 30 minutes before eating.

kalechips

Kale Chips

  • Juice and pulp of one lemon
  • 1 1/2 T apple cider vinegar
  • 2 T extra virgin olive oil
  • 1 T minced garlic
  • 3/4 t sea salt
  • 1 large bunch kale

Directions:

  1. Whisk all of the ingredients except the kale together in a really big bowl.  Set this “marinade” aside.
  2. Wash and spin kale dry.  Cut the leaves from the stalks and tear into chip sized pieces.
  3. Add the kale pieces to the marinade.  Coat the kale in the marinade, kneading it into the leaves.
  4. Lay the kale out in a single layer on food dehydrator sheets.  Set dehydrator to 145 degrees for 3-4 hours (OR just use your oven set on 140-150 degrees).  Kale chips are done when they are crisp and snap in half when bent.


Enjoy!

xoxo