spooky treats

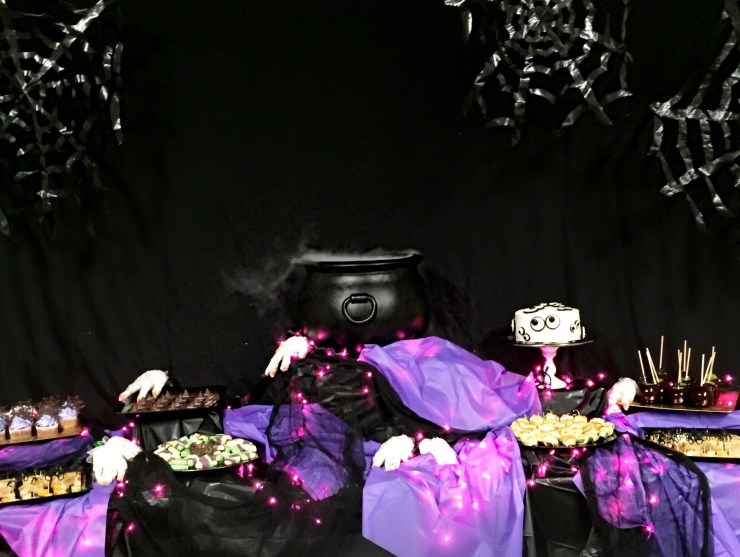
Those that know me, know I love to throw a party! Especially a halloween one! Today I am going to show you some of my go-to halloween party food items. Easy, fast, and super cute!

IMG_3694

Monster cake, poison apples, mummy jalapeño poppers, ‘witch’s brew’ root beer, sugar cookie candy corns, popcorn hands, magic wands, cheetoh pumpkins and spider web cupcakes- oh my! All of these are so simple and fast to make- which is needed when you are throwing a party.

I typically shy away from your “normal” holiday colors. I’m a sucker for purple, black, and green for halloween.

IMG_3695

For instructions on each of these fun party foods- see below!


Mummy Jalapeno poppers

10 jalapeno peppers- slice in half length wise. {I left the stems on and seeds in for an extra kick!}
8 ounces cream cheese- room temperature
8 ounces jack cheese- shredded
1 scallion- finely chopped
2 t. Lemon Zest
1/2 tsp salt
1 package refrigerated crescent rolls
2 eggs- beaten
1 Package candy eyeballs {I purchased mine at Michaels- you can find them at walmart, amazon, target, etc}

Preheat oven to 400° F. In a bowl, mix the cream cheese, jack cheese, scallion and salt together. Roll out the crescent rolls and separate into 4 rectangles- not the pre-cut triangles- with a perforation in the middle of each. Press your fingers into the perforations to seal them. You don’t want them splitting along the pre-cut areas. Cut each rectangle into 10 long pieces lengthwise.

Fill each jalepeño half with the cheese mixture. Wrap each jalapeño half with the dough, leaving a space for the eyes. On some I used a couple pieces of the crescent strips. Brush with egg mixture and place on baking sheet.

Bake in oven for 8-10 minutes. Once cooked, and slightly golden brown, remove from the oven and press the eyes onto them where you left an opening along the top. Serve while hot!


Candy Corn Sugar Cookies

2 Sticks Butter, softened
1 c. Sugar
1 Egg
2 T. Lemon Juice
2 t. Lemon Zest
1/8 t. Salt
3 c. Flour
1/2 t. Baking Soda
Purple Food coloring
Green Food coloring
Granulated sugar to sprinkle on top

Combine butter and sugar in a large bowl; beat at medium speed until creamy. Add egg, lemon juice, lemon zest, and salt. Continue beating until well mixed. Add flour and baking soda, beat until well mixed. Divide dough into thirds. Press one-third of the white dough evenly into the bottom of a loaf pan that you have lined with foil, wax, or parchment paper. Place another one-third of the dough into a bowl and add purple food coloring to it. Once it is mixed evenly, press the purple dough evenly over white dough. In another bowl, add the rest of the dough and the green food coloring. Press the green evenly over the purple dough. Cover and refrigerate until firm (2 hours or overnight is best). Once chilled, flip over your loaf pan and unwrap your dough. Flip it back over and get ready to cut! Cut loaf crosswise into 1/4-inch slices using a sharp knife, trimming edges to make even, if necessary. Cut each slice into wedges.

Place 1-inch apart onto a lightly greased cookie sheet. Bake for 7-10 minutes in a pre-heated 375 degree oven. Place cookies straight into a bowl with sugar and coat. Place coated cookies on a baking rack to cool.


Monster Cake

1 of your favorite cake box mixes or your favorite homemade batter
Homemade frosting or store bought!
1 package Oreos
1 package Oreos Minis
Regular chocolate chips
1 Box of Junior Mints

Mix, bake, layer, and frost your cake! Any flavor or colors you like! Once assembled- you can make your monster eyes. Separate all your Oreos and place them in pairs. Then, take some leftover frosting and attach the chocolate chips to the mini Oreos, and the junior mints to the regular Oreos. Once finished, use a little frosting on the back of each cookie to attach them sporadically all over the cake! Super simple and sure to be a hit!


Poison Apples

2 cups granulated sugar
3/4 cups water
1/2 cups light corn syrup
black gel food coloring
6 {or 12 small} green apples. Make sure they are not waxed!


Grease a piece of baking paper and place on a tray/baking sheet. Insert a skewer/popsicle stick/etc in all the apples and set aside.

In a medium pot, combine the sugar, water, corn syrup and food colouring and stir over medium heat until the sugar has dissolved. It should feel smooth. When the sugar has dissolved, turn the heat up and keep the sides of the pot clean with a pastry brush dipped into clean water to prevent it from crystalizing. Bring the mixture to a boil until a candy thermometer reaches 150°c/310°F, or hard crack stage.

Carefully dip the apples into the hot candy mixture and place on the wax paper to set and cool. Enjoy your poison apples! Not just for a party but, you could tie a ribbon to the stick and hand them out to friends as a fun treat!


Spider Web Cupcakes

1 box of your favorite cake mix
Homemade {or store bought} frosting & food coloring if you are wanting a color
1 Package Chocolate almond bark
Wax paper
Cupcake liners

Mix and bake cake mix according to directions- in regular size cupcake tins with liners. While they are baking, print out you favorite spider web template from here. You can print a few copies, or just slide it around, whichever you prefer. Place it underneath wax paper. Now, melt your chocolate almond bark according the package directions. Once melted, pour it into a plastic baggie and cut off one of the tips of the baggie- very very small cut! You are just wanting to make a tiny hole. Then, carefully trace your template on the wax paper. Repeat. Let them cool to harden.

Once your cupcakes are cooled, frost them and before the frosting hardens up a bit, carefully push one of your spiderwebs into the frosting. Voila!


Witches Brew Root Beer

2 oz bottle of root beer extract
2 cups sugar
1 gallon of water
Dry ice

Fill your container with 1 gallon of warm water- you want it warm because it will help the sugar dissolve. It also makes the dry ice more effective!

Add the root beer extract and sugar. Stir until the sugar dissolves.

Add the dry ice {do not touch it with your bare hands!} 10-15min prior to serving. You will need to let the dry ice do it’s thing for at least 10 minutes to cool and carbonate the root beer. Drink up!


Popcorn Hands

1 box unwaxed plastic, clear gloves
Homemade or store bought popcorn
1 bag of candy corn
ribbon
**optional: spider rings

Fill each finger of the gloves with a candy corn. Then stuff popcorn into the glove until full. Once full to your liking, tie off with a ribbon! Feel free to add a spider ring to one of the fingers for an extra spooky touch! Great for kid school parties!


Witches Hats

1 Package Keebler Fudge Stripe cookies
1 Package Hershey’s chocolate kisses
Homemade frosting or a tube of store bought in whatever color you prefer!

Lay out the fudge stripe cookies upside down on the counter/platter. Squeeze  small amount of frosting in the center and press on a hershey’s kiss candy {unwrapped}. Let set- and you’re finished! How simple was that!?


Magic Wands

1 Package of pretzel rods
2 Packages of white or chocolate almond bark (depending on if you are going to add food coloring)
Food coloring in the colors of your choosing.

Melt the almond bark according to the package directions- In mine above, I used the chocolate almond bark- pour it in to a tall cup. Next, dip your pretzel rods into the mixture and lay on parchment/wax paper to cool.

Then, melt the white chocolate (to be like the ones above) and separate into two bowls and add the food colorings of your choice. Once mixed, put the chocolates in to two separate plastic baggies. Cut diagonally across one of the bottom corners and drizzle the chocolate over the pretzel rods. Repeat with the other color(s). Let cool to harden!


Orange Pumpkins/Ghostly Bananas

Cutie Oranges
Bananas
Regular and mini chocolate chips
Black Sharpie

Draw a pumpkin face on each cutie orange with the sharpie.

Peel the bananas and cut them in half. Then place mini chocolate chips for the eyes, and a regular size chocolate chip for the mouth. Finished. So simple! Perfect for kid school parties!


Happy partying!


xox

aj

blue apron, gobble, and hello fresh

Unlike my sister, I do not enjoy cooking.  It’s not the actual cooking part that’s so terrible, but the menu planning, grocery shopping, putting away the groceries,  and prepping the meats and veggies that really take a toll.  By the time I’ve done all that plus the cooking bit, the meal is usually an overhyped disappointment that then has to be cleaned up.  Ugh.

So when I heard about services that deliver recipies and the necessary groceries straight to your door, I started trying them all.  The ones I have used the most (thus far) are Blue Apron, Gobble, and Hello Fresh.


Blue Apron

How it works:  Subscribe for either the “for two” plan at $59.99 per week, or the “family” plan at $69.92.  The “for two” plan provides 3 meals per week (6 servings total), and the “family” plan provides either 2 or 4 meals per week (8 servings total).  You can choose the meals you want to receive from the 4-6 meals offered that week.  It is a subscription service, so once you sign up you automatically receive meals each week unless you remember to login and skip a week.  And you can cancel the subscription at any time.  FYI- Even though it’s just me and the hubs, I usually opt for the “family” plan so that there are left overs for another meal or two 😉

How it compares:  In my experience, the Blue Apron meals are the most complex and take the most time to make.  Most of the ingredients arrive un-washed, un-prepped, and thrown together in singe box (other services separate the ingredients by meal).  The instructions are pretty detailed, and there are generally more instructional steps to follow than with other services I’ve tried.  For me, more steps unfortunately means more room for error, and I have not had a 100% success rate with the Blue Apron meals.  That said, many of the meals use interesting ingredients that I would not otherwise have tried to cook with, so that’s fun.  And I don’t think I ever made one that required a microwave(I don’t like microwaves), so kudos on that!

Takeaway:   Good for trying something new, particularly if you like to cook or want to make a date night event of it.  These days I only order Blue Apron as a date night activity or as a fun way to get houseguests involved with making dinner.  The recipes are just too complicated for me to enjoy tackling on my own.  Remember though, cooking really isn’t my thing.


Gobble

How it works:  Subscription options are 3 dinners for 2 people (6 meals, or $71.70), or 3 dinners for 4 people (12 meals, or $143.40).  You can login online to remove or change meals for any week and pricing is based on the number of meals ordered:  $11.95 per meal if you order at least 6 meals; $13.95 if you end up only ordering 4 meals.  So for 6 meals it would be $71.70, and for 4 meals it would be $55.80.  As with the other services, you can choose your meals, skip weeks, and cancel at any time.

How it compares:  Sooo easy and quick to get from fridge to hot on the table.  The service boasts “from kit to table in 10 minutes”, which might be possible if you practiced and felt like racing through the process.  I prefer to kick things off by pouring a glass of wine and I clean up as I go so there is minimal to do after I eat.  But even with my slower approach to cooking I manage to get Gobble meals to the table within 20 minutes or so.  And the food is consistently good.  The ingredients arrive separated by meal, and many of the ingredients are already washed and some pre-prepped.  I don’t like that microwaving is regularly listed in the instructional steps, but if you don’t care about racing the food to the table you can simply heat those bits on the stove.

Takeaway:  Super simple, fast, and good.  The weeks that I have Gobble, I feel I eat better and I am happy to “cook”.  If you’re one of those that really enjoys cooking though, this may not be the service for you.  Some meals may feel more like glorified food assembly than an actual culinary activity, but for me that’s just fine.


Hello Fresh

How it works:  Subscribe to receive a “classic” box for 2 at $69.00, a “veggie” box for two at $59.99, or a “family” box for 4 at $105.00.  Each box contains 3 meals and the 3 meals are pre-selected for you, but you can swap them by logging into your online account (assuming you remember to do so in time).  And same as the others you can skip a week or cancel at any time.

How it compares:  To me, Hello Fresh is a simpler version of Blue Apron.  The ingredients all arrived separated by meal, but for the most part un-prepped.  Each meal seems to have a relatively small number of ingredients, and the instructional steps were also fewer.  And I am proud to say I have had a 100% success rate with the Hello Fresh meals!  I even kept some of the recipe cards for future use.

Takeaway:  Relatively quick and easy, and consistently good.  More prep required than a Gobble meal, but less complicated than a Blue Apron meal.  This service is good for those who want to make a good, simple dinner from scratch without the hassle of meal planning and grocery shopping.


Happy cooking!

xoxo

ash

halloween costume ideas

October will be here before we know it, and that means dress up time!  If you haven’t started costume brainstorming, you need to get going.  Plan early so that you can find and/or order the pieces you need for the perfect look.  Need some ideas?

Random Awesomeness.

Thor.  Yes please.
Lucy.  I always think of the chocolate wrapping episode.  hahaha…
Goonies Sloth.  Such a great movie.  Here are some good Sloth clips.
Pug.  Because pugs are my favorite and this is funny.
Black Widow.  She’s such a bad ass.
Britney Spears.  Britney made a comeback this year, so why not take it waaay back?  Just add a blonde wig and “… Baby One More Time”.
Deadpool.  And for a few more bucks this one comes with muscles.
Pokemon Pikachu.  Pokemon are virtually everywhere these days.
Marilyn Monroe.  A classic.


Groups/Couples.

Suicide Squad
Deadshot.  Harley Quinn. Joker. KatanaKiller Croc.  Need help getting to know the characters?  Check out this fun little video

Old School Batman
Do you remember?!  The TV show was so great.  %$#BAM!  POW!@#  Batman and Robin, or  legit Batman and legit Robin.  And of course, Batgirl.

Beauty and the Beast
BelleBeast.

Cinderella
Prince Charming and Cinderella.

Snow White
Snow White. Evil Queen. Prince.

Already have a generic princess costume? (me too!)  Make it a couples costume by adding a  Frog Prince or Knight.


Kids.

Batman.  Because he’s totally cool, especially the Christian Bale one. (amiright?!)
Elsa.  Yah, that’s still popular.
Garden Gnome.  Expedia? Maybe an Amelie theme?
Future Golfer.  LOL!
Thing 1 and Thing 2.  Got twins?  This is perfect.
Unicorn.  Because it’s a UNICORN!  Too cute.

Older kids and teens were left off this list because they will undoubtedly have their own ideas.

So who or what will you be this Halloween?!!

Trick or Treat ya’ll!

xoxo

ash


costume-cinderella-and-prince

(Halloween 2015)


a prague wedding

This month I am celebrating my first wedding anniversary!  As with nearly all weddings, not everything went as planned.  Even with the hiccups though, most things fell into place.

Tips for planning a destination wedding: 

  • Choose a place you have been and love, and host a welcome event before the big day for guests to meet and mingle.

My husband is from the Czech Republic, his entire family lives there, and our stateside friends are a traveling bunch, so we decided to have our wedding in Prague.  We hosted a private welcome dinner boat cruise a couple days before the ceremony.  It was a great way for us to spend time with everyone, for our guests to meet each other, and to take in the sites of the city from the Vltava river.

  • Keep your wedding party small and color coordinate for photo ops. 

We stayed in the beautiful MaMaison Riverside Hotel in downtown Prague and on the morning of the wedding my mom, sister, and close friend helped me get ready.  We wore coordinating robes by Plum Pretty Sugar and sipped on Veuve Clicquot, of course!

  • Choose a dress that travels well, and preferably fits in a carry-on.  

Some day I may share my nightmare marathon dress shopping experience, but ultimately I chose a beautiful Monique Lhuillier ‘Harper’ gown.  The gown was a slim sheath style made of lace and tulle that easily rolled up into my carry-on luggage.  I luckily found the dress at Glamour Closet in San Francisco just one month shy of the wedding.  Glamour Closet also has stores in Los Angeles, Chicago, and New York, and it is a great place to find showroom and runway samples to buy off the rack for much less than retail!  As an aside, for alterations I highly recommend Lynne Ghallager at Wee Scotty.  She had my dress fitting perfectly in record time, and she has the coolest resumé I’ve ever seen.

  • Leverage the musical talents of family and/or friends.   

As I walked down the aisle with my mom, my dad played guitar and my sister sang Bob Dylan’s Make You Feel My Love (also sung by Adele).  It was way better than a recording, and much more affordable than hiring a band.

  • Rely on beautiful scenery to keep decorating and set-up needs to a minimum. 

The ceremonly took place in a covered area of the garden decorated with magnificent murals and statues.  Ten chairs were provided for family or those who needed to sit, but for the others it was standing room only.

  • Keep the ceremony short and the champagne flowing. 

The ceremony was relatively short and ended with the witnesses (my sister and the best man) signing the marriage certificate, followed by champagne!  There was some comic relief when the best man realized he had left the ring in his bag and had to run and get it mid-ceremony.

  • Choose centrally located venues, in close proximity to each other, and provide guests with maps. 

The wedding ceremony was at Vrtbovska Zahrada, one of the Prague Castle gardens.  After the ceremony guests walked or took a private bus down to La Terrassa, a spanish restaurant on the Vltava.  All of the event locations were walking distance from downtown, or a short cab ride for those in heels.  A map and schedule of events, along with a list of nearby hotels, was provided to guests well in advance of the wedding for trip planning purposes.
wedding-map

  • Meet with venue staff well before the big day, and incorporate local traditions. 

The reception staff was beyond wonderful and accomodating.  They even surprised us by breaking a dish when we arrived, which in Czech tradition must be cleaned up by the bride and groom.  The broken plate pieces are said to bring happiness, and cleaning up the mess shows the will of the couple to cooperate.

_DSC7412

The staff also swapped out their usual spanish fare for a traditional Czech menu.  And in line with tradition, they served us Czech wedding soup that the newlyweds eat jointly as a sign of unity.

La Terrassa has since closed and in its place is a restaurant called MANU Risto.  I have not yet been to Manu Risto, but if you are ever in Prague the location alone would make the restaurant worth checking out, even if just for a cocktail.

  • Have cake, even if you don’t think you want one. 

We had planned to forego cake and instead serve kolace and local cookie varieties.  However, when we visited the bakery to order the sweets the owners talked us into a cake.  We chose a medovnik, a honey cake found throughout the Czech Republic.  I have never attempted to make it, but a google returned a few recipes including this one from Pauline’s Cookbook and this one from Czech in the Kitchen.

The cake was incredible, the best I’ve ever had, and I’m so glad we made the last minute decision to have one.  The cake topper was made from wire that we twisted to into “Pavash”, a mashup of our names (Pavel and Ashley), a nickname we’ve grown to love.  The flowers from my sister’s wrist corsage completed the simple cake decoration.

  • [Rock and] Roll with any surprises. 

The “DJ” that we hired sight unseen (or heard) actually ended up being a one-man-band with a microphone and synthesizer.  In a thick Czech accent he belted out an Elvis song for our first dance.  His style was unexpected but perfect and he and the slivovitz kept the party going.

DSC_0355

6


xoxo
ash


recent reads on money

As mentioned before, I spend 2 hours a day commuting, driving a stick-shift in traffic back and forth to work (ugggghhh… I know).  To make the drive tolerable and not feel like I am wasting life, I listen to audiobooks.  I prefer nonfiction because it really makes the drive feel like I’m multitasking in a positive way.  While I do love a good morning talk show with a juicy gossip roundup, 10+ hours of that a week and I can feel my brain turning to mush.

I’ve never been great, or even good really, with money; so over the last month I scanned iBooks and Amazon for audiobooks related to money and investing.  Out of the ones I have read and/or listened to, these stood out.

book snowball
The Snowball:  Warren Buffet and the Business of Life by Alice Schroeder.  I recently opened an individual investment account and funded it with $4k to try and figure out how it works.  I knew vaguely that Warren Buffett was a pretty good investor, so for inspiration I downloaded The Snowball and it did not disappoint.

book total money makeover
The Total Money Makeover:  A Proven Plan for Financial Fitness by Dave Ramsey.  I read this book almost 5 years ago, but felt it important to include here since it helped get me out of debt for good.  By my early 30s I had thrice gotten myself into significant credit card debt (well into 5 figures… oops :-/ ).  I managed to get myself out each time, but money stress sucks big.  The third time I found myself in debt I committed to making it my last.  On the recommendation of a close friend I read The Total Money Makeover and gave my money sitch a reboot.  While Dave gets a bit preachy, literally, in some of the pages, the book did what it promised.  I managed to pull myself out of debt within a year and I have been debt free ever since. WOOT!

book rich dad
Rich Dad Poor Dad:  What the Rich Teach Their Kids About Money That the Poor and Middle Class Do Not by Robert T. Kiyosaki.  In the book the author describes growing up with two dads with disparate views on wealth, his real dad and his best friend’s dad.  The book completely changed what I consider to be an “asset”.  For example, you may be able to claim your home and car as assets on a mortgage loan application, but they are not!

book the millionaire next door
The Millionaire Next Door:  The Surprising Secrets of America’s Wealthy by Thomas J. Stanley and William D. Danko.  Not what I’d call a page-turner, this book is filled with statistics and acronyms and I probably would have put down if reading in hardcover.  If you can get through it though, it’s got some good insight on how to go from being a UAW (Under Accumulator of Wealth) to a PAW (Prodigious Accumulator of Wealth) and the benefits of getting there.  The book makes clear that when it comes to spending money the majority of millionaires are not keeping up with the Kardashians, or even the Joneses for that matter.  PAWs live below their means, no matter their incomes.
Get your financial $h!t together!  It’s worth it.  For realz.

xoxo

ash


BFHU – raw edge dining table

I have always coveted raw edge dining room tables. That being said, the one I found and fell in love with was $25,000! Can you believe that? So, I set out to make my own, to seat 8- and under $2,000! 

I first needed to find the wood slab. I started by of course googling “raw wood slabs” in my area. This came back with no luck. I then got the idea to call local cabinet shops. Sure enough, a cabinet shop near me had several different types of raw wood slabs! This is the part of the project that can cause you to stay in budget or go way over. Depending on the type of wood and size, you can find one for $500-5,000. I went over and found one in my budget (under $1,000)  and roughly the proper size. They offered to cut it down a little bit on one end- which was helpful. It needed to be fully dried- so they continued to do that for me, and a few weeks later he had me come take a look. 

IMG_3376

It had a few splits in the wood that needed to be filled with resin, and the owner of the shop also recommended re-enforcing them with “bowties” so it would not continue to split. At the time I was doing this, I was very pregnant so a few of the tasks- like the resin, I could not do (heavy duty chemical). So, for a fee of about $300, they completed the bowties and resin for me. 

IMG_3377

When I finally managed to get the slab home, I took a power sander to it and smoothed it down- both sides. You can imagine my husband’s face every time I needed it turned over. It is HEAVY! I removed some of the natural bark along the edges, but chose to keep some of it to make sure and give it that raw-edge feel.

IMG_3378

Once sanded, it was time to seal it. The owner of the cabinet shop suggested using Waterlox. It is what he uses in his shop. This required several coats with a foam brush, and in small sections- both sides of the table and along the edges. The directions on the Waterlox website are excellent- please refer to those for more detailed instructions. Make sure to be in a well ventilated area that is free from dust! You don’t want little particles getting in your sealer. I also recommend a mask- this stuff is STRONG.

Screen Shot 2016-08-23 at 9.50.37 PM

After it was completely dry, I installed the legs. The legs I designed with a gentleman I found on etsy. There are several vendors on there willing to make metal legs- It just depends on the style and price point you are going for. We worked together to figure out the best legs to give me the look I wanted, while staying in budget,and most importantly supporting the massive slab.

IMG_3379

drum roll please….

IMG_3413

IMG_3407

IMG_3408


Final cost: approx. $1700. 

I get more compliments on this table than any other piece of furniture in my house. I love being able to say I made it! I have now used the table for close to 3 years. I am proud to say that it doesn’t show a bit of wear- and that is saying something, with two little kids eating, coloring, and crafting on it daily!


xox

aj