the nude flat

The nude flat is a wardrobe staple.  While I love heels, flats are a necessity for walking to the coffee shop, chasing down the muni, and scaling those San Francisco hills.

Because I wear them so much, I do tend to splurge on nude flats.  By breaking down the cost into a price-per-wear I convince myself that the expense is totally reasonable.

nude flats

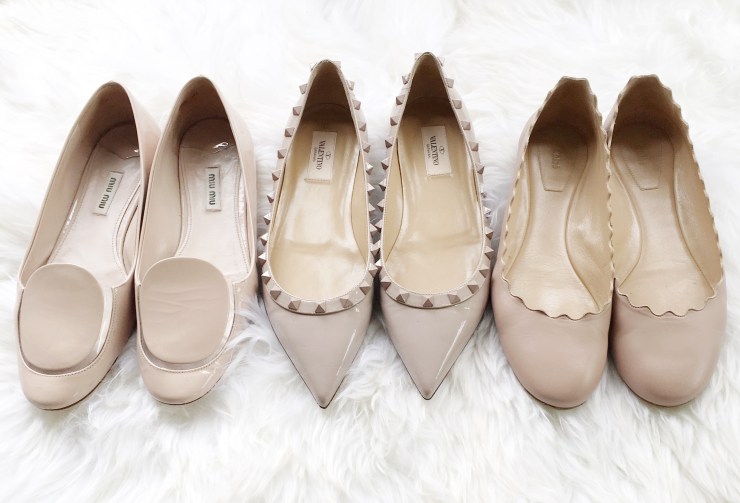
That said, I also take great care of my shoes and I  get protective soles on them before ever wearing them to ensure the longest life possible.  If you live in San Francisco, Galletti Shoe Repair is THE BEST in my opinion (and they have red sole protectors for your Louboutins).

nude flats 2

Here are some of my current faves for chic nude flats in every price range:

LC flats  LC Lauren Conrad Scalloped Ballet Flats now $29 (was $49)

steve madden flats  Steve Madden Elusion d’Orsay Flats in Natural $59

saks flat1  Saks Fifth Avenue Leather Point Toe Flats now $79 (was $150)

sam edelman flat  Sam Edelman ‘Reema’ Half d’Orsay in Oatmeal Suede $109

mesh flatNeiman Marcus Gertrud Flat now $111 (was $139)

chloe flat  Chloe ‘Lauren’ Scalloped Ballet Flat in Taupe $495

valentino flat  Valentino ‘Rockstud’ Ballerina Flat in Poudre $745


xoxo

tidying up

A while back I talked a bit about the Life-Changing Magic of Tidying Up by Marie Kondo.  Well last month I put her trademark Konmari method into action, and I am so glad I did!

The Konmari method applies not just to clothes, but to all objects around the house including paper, books, momentos, housewares, etc.  Clothes though are the starting point.  I emptied my two closets onto the bed and floor.  My closets are averaged size by San Francisco standards, but relatively tiny in my opinion.  All of my clothes managed to fit inside, but just barely.  After going through each item, identifying those that still spark joy, and discarding the rest, my closets were transformed!

I’ve even gotten rid of more items since the purge and I haven’t missed a thing.  Goodbye jeans that no longer fit, goodbye dress I never wore, goodbye clothes that were loved and worn tons but are no longer my style, goodbye clothes I binge bought on a too-good-to-pass-up sale that no longer get me– goodbye and thank you.

But the changes went beyond the closets.  As I applied the Konmari method throughout the house the energy in the space shifted – and my energy shifted!  Guests that stopped by would comment on how nice the house looked — “Did you paint?  … The trim, you changed the color of the trim?! … What did you do?  Your house looks great!?!”  And the answer was simply that I got rid of stuff that I didn’t need and that didn’t spark joy!  That’s it.  It is so simple and has such a huge impact.

Imagine sitting in your home and everywhere you look are things that spark joy — no, everywhere you look there are only things that spark joy.  Can you imagine?!  How awesome would that be?!

I had heard about Marie Kondo’s methods and I’d thought I got the gist, but it wasn’t until I actually started listening to her book that I really drank the Kool-Aid.  I commute 2 hours a day for work and I fill the ride with audiobooks.  The first day I started listing, I could not wait to get home and to start the tidying process!

So if you haven’t already read or listened to Marie Kondo’s The Life Changing Magic of Tidying Up – IN ITS ENTIRETY – then do so stat!  You’re going to love yourself for it.

IMG_8646


Happy tidying!
xoxo

wedding guest dress

wedding guest dresses

This weekend I’m headed to a wedding.  I love going to weddings!  Weddings are great excuses to dress up and sip champagne, two of my favorites.  But what to wear?!  Here are some of my current picks for wedding guest attire:

Eliza J – Lace Fit & Flare Dress ($138)

Vici Collection – Thora Maxi Romper ($68) in mustard.  The romper-dress also comes in wine  and black.

Alfred Sung – Woven Fit & Flare Dress ($198) in royal

Jay Godfrey – Strapless Popover Crepe Jumpsuit ($495)

Vici Collection – Girl About Town Dress ($48) in black

Roseblock Cross-Back Dress (was $198, on sale for $119—plus an additional 25% off!)

Vici Collection – In the Moment Wrap Maxi Dress ($62)

Jackie Jumpsuit ($240)

Stella McCartney – Rita poppy-print asymmetric-hem silk dress (was $1,365; on sale for $738)


xoxo

BFHU – adding style

A budget friendly house update (BFHU) style edition.

IMG_8477-1

Tada!  The living room is complete.  While there are still things I may want to change eventually, for now it is balanced and happy.   In my quest to create a serene living space I learned quite a bit.  Those nuggets of wisdom are memorialized in the below list of do’s and don’ts.  And for full disclosure I included a summary of my costs.  Spoiler alert– I did go over budget by $24.

(the before and after)

As you can see in the previous post, we managed to spiff up the fireplace and shelves in the living room with some simple white paint.  With no style direction though, the improvements fell short.  The room felt unfinished.  It felt eclectic and cluttered and I was stressing about it.  The room was giving me anxiety.  Silly maybe, but true.

Do’s and Don’ts of Style on a Budget

  • Do have a clear picture of the style you are wanting and stick to it.  This was really hard for me because I love lots of styles and tend to change my mind frequently.  This may be fine when choosing an outfit to wear, but it can get really costly and time consuming with interior decorating.
  • Do choose a neutral color palette for the walls and furniture.  This is particularly true if you are someone who wants to change up the style of your room regularly.  You can then mix up the style on a whim with less costly and easy to switch out pillows, throws, side tables, and other accents pieces.
  • Do research to learn what you like and discover your style goal.  I spent a week looking at photos of living rooms on Houzz, going to open houses, flipping through home decor magazines (Restoration Hardware, West Elm, Anthropologie Home, Pottery Barn, and Wayfair to name a few).  I would take pictures of anything that caught my fancy, and then review the photos later for patterns and common elements.  I noticed that I was gravitating toward rooms with lots of light and white, and loads of texture.  And so my style goal took shape:  a clutter free contemporary light drenched room with lots of white and cream and accented with pieces having cozy textures.
  • Do identify the pieces you have that you love and incorporate them.  For me these were the coffee table, white throw blanket, and gold polka dot pillow.  These are the pieces that make me happy whenever I see them.
  • Do set a budget.  Once you have a style goal, figure out how much you’re willing to spend to achieve it, and the cost range of the items you want in your ideal space.  Then start prioritizing.  For me, I could not afford to go over $1,500, and I felt that (in additional to painting the fireplace and shelves white) changing up the rug would make the biggest impact.  So while I don’t really love the current couch and chairs, given their relatively neutral color I figured I could work with them.
  • Do get rid of clutter.  Getting rid of clutter is the most cost effective thing you can do to improve the space.  If you don’t love it and you don’t absolutely need it – get rid of it.
  • Don’t buy things just because they are on sale.  This goes out to all you Target shoppers.  I know how it is.  You go in for toilet paper and socks and you come out with a decorative deer bust, cutesy burlap wall decor, throw pillows, candle holders, and maybe even a rug.  These impulse buys are mistakes you make when you don’t have a clear style plan.  They’re on sale and you think you’re saving money, but more often than not they’re a total waste.  Don’t do it.  Focus on getting a style plan first, and then if you find something on sale that fits into that plan – GREAT!  Plan first, shop second.
  • Don’t shop where you can’t afford.  It’s just a depressing time suck.  I love Restoration Hardware stuff, so I look through their catalogs for inspiration – but for this project I did not set foot in their store.  I was in love with an RH fireplace screen, but at $600 my budget would have quickly be blown.
  • Don’t ask everyone for their opinion.  Asking lots of people with differing style persuasions will yield many opinions and could lead to self doubt, frustration, and even depression.  Don’t do it.  Limit your opinion asking to a very short list (1-3 max) of people whose style you admire.

(before and after)

IMG_8480-1

Total cost:

  • Souk Wool Rug from West Elm.  The 9×12 is normally $1,329, but I was able to snag it on sale.  Still with tax and shipping it ended up being right at $1,000.  It was important to me to have a good quality real wool rug, so I was fine with spending the bulk of my budget here.  Still that meant only $500 for any and everything else.  Eek.
  •  Ultra Plush Rug Pad on Amazon.  The 9×12 rug pad cost roughly $75 and included free shipping.
  • Pleasant Hearth Fireplace Screen on Amazon. The screen cost me $75 (a tiny fraction of the cost of the RH one) and I love it!
  • Bevel Rectangular Mirror from Pottery Barn.  On this item I really lucked out.  I saw it in store, but at $399 it was beyond my reach.  Then a few days later I happened upon it at a warehouse sale for $190 and snatched it up!
  • Gallery Carbon 5×7 Picture Frame from CB2 for $40 each; so for 2 I spent $80.
  • Faux Fur Euro Pillow at Target on sale for $25 (orig. $35).
  • Blown Glass Lantern at Target for $17.  I bought 2, so $34, to balance each other on the shelves, but one is currently acting as a flower vase elsewhere.
  • Stainless Steel Lantern at Target on sale for $5 (orig. $19).  I found this lantern on clearance at my local Target and I really quizzed myself on whether or not it fit into my style plan or if I was just buying it because it was on such a good sale.  Clearly I decided it fit, but do beware of impulse sale purchases!
  •   Orchids and succulents.  These I picked up at my local Home Depot.  The orchid was about $20, and the succulents about $2.50 each x 8, or $20, for a total of $40.

TOTAL:  $1,524

I admit I came in slightly over budget… but overall I’m super happy with the results.

IMG_8487IMG_8488-1

And finally, a HUGE shout out to my extremely talented mom who created the painting of Charles Bridge for the room, complete with gold splatters to compliment my favorite gold polka dot pillow.  It is true that most custom art would have thrown this project way off budget, but thankfully I was able to pay her in peanut M&Ms and diet Dr. Pepper.  THANK YOU MOM!!

(FYI – turn books around for a more neutral palette)

Happy renovating!
xoxo

BFHU – the fireplace

A budget friendly house update (BFHU) for the fireplace.  Here are the details of my experience, and some super simple directions for whitewashing brick.

IMG_8194

It was a tough decision whether or not to paint the brick fireplace.  While we love the look of natural stone and brick, our fireplace was just not working.  And those mirror tiles in the back of the shelves… wow.

I started by getting rid of the mirror tiles, which came down surprisingly easily.  And to our   surprise we found that the wall was made of thin wooden planks and was signed and dated by prior owners!  Super cute.  After removing the tiles I sanded the wooden planks a bit to remove any leftover sticky from the mirrors and wiped away the dust with a damp rag.

With the wall prepped I wanted to start painting straight away.  Literally could not wait, so I used some white paint we had leftover from painting trim around the house (Benjamin Moore Regal Select in White with Pearl Finish).

IMG_8235

And when I was done it looked SO MUCH BETTER! … but still didn’t feel quite right :-/

IMG_8236

(Still less than good, huh?  Yah, I was a bit bummed too.)

All that work, and it still felt like a cluttered mess with no clear style direction.  Sigh.  But that was about to change.  My mom and sister came for a visit and the three of us decided to see what the fireplace would look like white.  So we read some online tutorials for whitewashing brick, watched a couple YouTube videos, and went to work.

As an aside, I might suggest giving your husband or domestic partner a heads up before beginning similar projects.  I did not, and there was an initial adverse reaction.

A short time later, the fireplace was white – glorious gleaming white!

IMG_8242

I instantly LOVED the crisp clean feel of the white… but how to style it?!  Well the big style reveal and details will be up on the blog soon.  In the interim I’ll leave you with some super simple whitewashing instructions.  🙂


Whitewashing Brick

You’ll need:  

  • rags
  • painter’s tape (optional)
  • drip cloth (optional)
  • paint brushes
  • white paint (we used Benjamin Moore Regal Select in White, Pearl Finish)
  • 1/2 gallon(ish) sized container  (we used tupperware)

Directions:

  1. Use the painter’s tape and drip cloth to cover anything you don’t want paint to get on.  (good luck)
  2. Using the 1/2 gallon container, mix some white paint with water –  roughly 50/50 mix depending on how opaque white you want the result. (FYI:  We ultimately decided we wanted the bricks solid white, so our ‘mix’ got progressively thicker… hindsight we probably could have just applied the paint straight from the bucket.)
  3. Paint a section of the bricks (maybe 1.5 ft square) and then dab at the wet paint with a rag to give a slight texture and remove any drips.
  4. Then move on to paint another section of bricks, dab at the wet paint, and repeat.  After 5-10 minutes you’ll notice that the bricks will have absorbed some of the paint and the white will fade a bit.  Simply keep repeating the process until the desired color is achieved.

IMG_8250

Happy renovating!

xoxo


BFHU – the bathroom

A Budget Friendly House Update (BFHU) for the bathroom.

The MLS photos of the house we bought literally showed it in the best light – like with a magic filter that brightened all the rooms, blurred the cracks in the walls, and changed the tint of the tile in the split bathroom.  Because of the bright yellow tile and faint moldy smell, updating the bathroom was a priority.

Ideally we would have loved to gut the split bathroom and merge the rooms into a shiny new full bath, but we’d sunk all of our funds into the downpayment.  That tile though.  So I had a google and found the Homax “Tough-as-Tile” Tub & Sink Refinishing Kit ($38 at Home Depot).  I think this stuff is really intended for smaller jobs, but I figured if I could give our bathroom a facelift for less than $40 per box it was worth a shot.  I picked up 4 boxes of the Homax brush-on product ($38×4), a vanity that was on sale for $99 (similar here), a faucet for $40 (similar here), a new light fixture for $80 (similar here), and some paint.  I then spent a three day weekend on the project.

(Instructions say don’t use an electric sander, but do you see all those tiles?!?!)

I used the Homax product to paint the tiles on the walls and in the shower.  I did not use the product on the tub itself.  To prep the tiles I used an electric hand sander with 35-40 grit sandpaper and I went over the tiles with the sander only once.  I note this because there are warnings not to use an electric sander as it could tear up the surface, but I did not have an issue.  The instructions also say to prep the area by sanding three times, but I did not have the patience.  I do think some additional sanding prep would have been beneficial, but for me it wasn’t worth the time or energy.

(The tub appears to bow a bit, but that’s just my bad photography.  What’s that brown stuff?  #gross)

The actual painting of the Homax product takes s o  m u c h  l o n g e r than I thought it would.  The paint is thick and sticky, and you really need to apply it in relatively thin coats for an even finish.  I also found that the instructions aren’t kidding when they say to paint in a single direction with overlapping strokes.  If you think this stuff will go on just like painting a wall in your living room, you are wrong.  If you are painting a large area it will take a long time and it will be painfully slow and it will suck.  I also did not follow the instructions about using a good quality mask and I was quite ill with a horrible headache the next day… but some inexpensive Advil fixed that.

(Forgot to mention that I had an old mirror that I repurposed over the sink here.  And yes the cavity of lathe and plaster is simply hidden behind it.)

It took 3 cans/kits of the Homax product to paint 2 coats for my project.  I kept the 4th can for touch ups, and it turned out that I needed it (though not a lot).  When I taped the tiles to paint the walls, some of the tough-as-tile paint pulled off when I removed the tape.  There were only 3-4 bits that pulled off, and the amount that pulled off was smaller than a fingernail in size.  I just touched up the few spots with the extra product, no biggie.  For what it’s worth, I think the bits might not have pulled off had I done the 2nd or 3rd recommended sanding/prepping sessions.  Also, definitely wait the full 72 hours cure time per the instructions too!

All in all we are very pleased with the results.  It’s been over 2 years since we painted the bathrooms, and so far so good!  We were able to completely re-do the (split) bathroom for less than $400 and would highly recommend the Homax product to anyone with icky tile to cover on a budget!

IMG_8147-1IMG_8148IMG_8146-1

Happy renovating!
xoxo